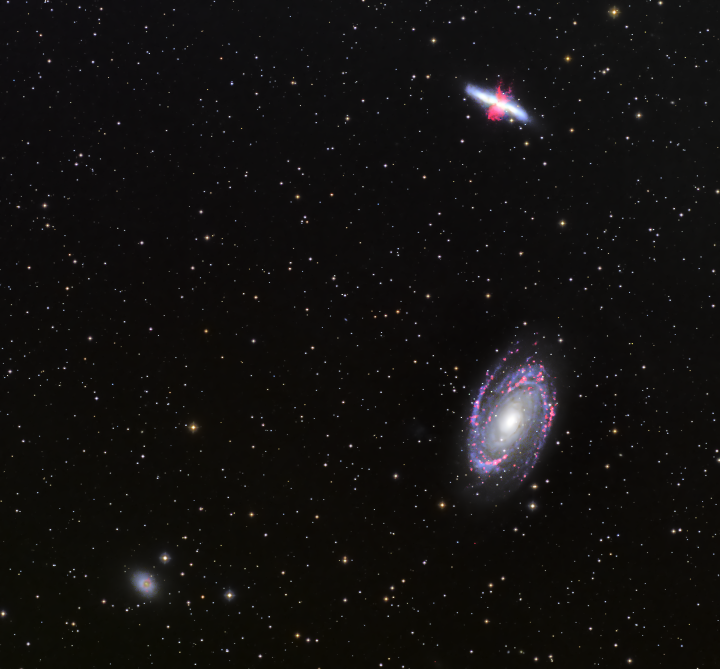
Messier 81/82 using Narrowband for Stars
April
2014 - May 2014
December 2014 - February 2015
November 2105
February 2016 - May 2016
These two Messier objects are some of the most
northerly objects visible from the observatory. I had to
aggressively trim a tree just to image them. As can be seen in the
timeline this is a project that I have worked on for a while. I
tried imaging these in 2012 using
color filters and my older 8300 camera, but was not able to get a full
set of data.
Starting in Spring 2014 I began collecting data for a Narrowband
for Stars project.
Originally my goal was to just use 900 second (15 minute)
exposures. After taking a look at the data in 2015 and improving
my tracking by purchasing the 1100AE I decided to up the exposure to
1800 seconds (30 minutes). That gave me deeper exposures, but
saturated the stars. To improve the star images I started to
collect short exposures, but ended up with only a limited set. I
then used HDR to combine 60, 900, and 1800 seconds into a
composite. The 1800 second exposures produced really fat stars so
as a last minute adjustment I overwrote the bright stars with the 60
second data.

click for a full size image. Here are two alternative processing A1,
A2
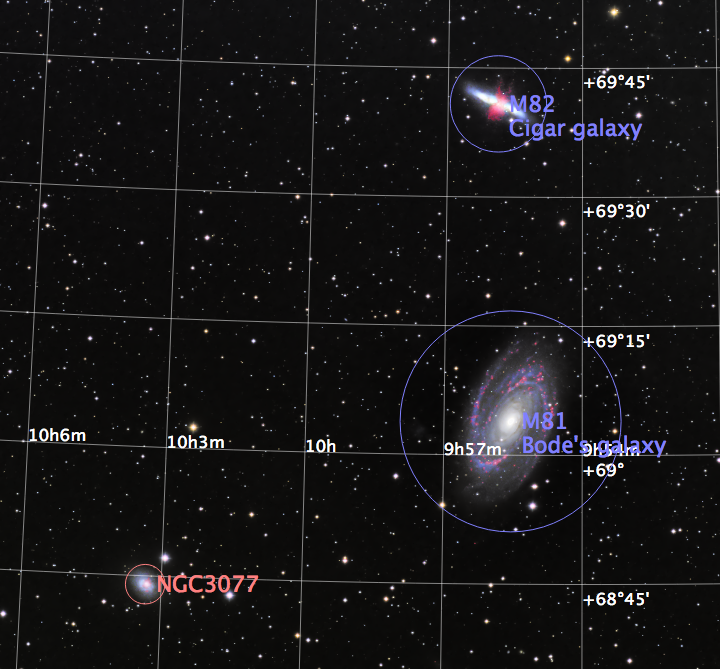
Annotated Map
This is a map of the frame area. Many of the "stars" are actually
galaxies. Click for a more detailed map including the dim galaxies.

click for a more detailed map.
Processing Details
Exposures before summer 2015 were made using the AP 900 under the
control of APCC Pro. Later images used an 1100AE that was self guiding
through all exposures.
Processing was challenging due to the impact of light pollution
particularly on the sYel image. I did a complete processing run
using only the 1800 sec exposures, but was not satisfied on how the
galaxy cores and the stars looked. I also tried processing using
Drizzle (both with and without expansion) but did not feel either
produced a better image.
Since I had the 900 sec data I
went ahead and collected 60 and 300 second data. The
HDRComposition was not able to use the 300 sec data.
Hydrogen
(3nm)
|
|
sV
|
|
sYel
|
|
Ha20
(20nm
Ha)
|
|
All images were processed by
Pixinsight.
Using HDRComposition I built HDR_Ha20, HDR_sYel, and HDR_sV.
These were combined using ChannelCombination to form the initial HDR
image.
Color Calibration
I used the Color calibration data the M31
project.
Ha20
|
0.38
|
sYel
|
0.26
|
sV
|
1.0
|
Adding Ha
The Ha data was added
using the Vicent Peris technique
I learned at the 2014 Katonah NY workshop and described in this Harry's
Astro
Shed tutorial among other places.
Given two original images Ha and uncorrected HDR'd Ha20 from the above.
Ha_clean = Ha_clean - (Ha20_HDR -
Med(Ha20_HDR)) * 0.25
Note that I used the original Ha20 instead of extracting R from the
above. Not sure why I did that, but that is what I did. I
also suppressed all stars using a star mask to set the stars to black.
Again I probably should have used Med(Ha_clean) so there would be no
affect on the final image.
I then combined the Ha into the RGB.
R = R + (Ha_clean - Med(Ha_clean)) *
0.75
Final Processing
I ended up working on the processing for several weeks. Each
attempt either had cartoonish Ha or too little remaining stars in
M81. Eventually I got an "A1" version that was credible. M81 was
still washed out. I then changed the processing using Exponential
Transforms and
LocalHistogramEqualization to obtain the "A2" version. This shows the
M81 better and still shows the jets from M82. I did not like like
the appearance of M81.
In the end I created an "A3A" version which is what is being displayed
above. It is basically the "A2" version, but uses Median
Transform (instead of Small Scale 3) in the HDRMultiscaleTransform and
is masked so only 50% of
the change is applied. That gave an acceptible compromise of showing
the dark areas without washing out the bright areas. The final trick
was to overlay the bright stars with those in an image of just the 60
sec exposures. This leave some halo, but the stars have good
color and tight shapes.
I completed the processing with my usual steps; increase the
saturation, sharpen, and noise reduce as described in my Sample
Workflow.
Copyrights For Photos

(c) 2016 Robert J Hawley.
Except as noted,all work on this site by Robert J. Hawley is
copyrighted under a Creative
Commons
Attribution-Noncommercial-Share Alike 3.0 United States License.
This permits the non commercial use of the material on this site,
either in whole or in part, in other works provided that I am credited
for the work.
11/23/17


